
TypeScript Tutorial: What is, Interface, Enum, Array with Example
What is TypeScript?
TypeScript is a superset of JavaScript. TypeScript is pure object-oriented programming language that supports classes, interfaces, etc. It is an open-source language developed by Microsoft which statically compiles the code to JavaScript. It can easily run in a browser or Nodejs.
All the latest features released for ECMAScript are supported in TypeScript and in addition to it TypeScript has its own object-oriented features like interfaces, ambient declaration, class inheritance, etc. which helps in developing a large application which otherwise would be difficult to do in JavaScript.
How to Download and Install TypeScript
Here is the step by step process to download and install TypeScript:
Step 1) Download and Install Nodejs
Go to the official site of nodejs : https://nodejs.org/en/download/ and download and install nodejs as per your operating system. The detailed instruction on how to download nodejs is available here:
Step 2) Check Nodejs and npm version
To check if nodejs and npm is installed just check the version in your command prompt.
D:\typeproject>node --version
V10.15.1

D:\typeproject>npm --version
6.4.1
So you have nodejs v10 and npm 6 installed.
Step 3) TypeScript Installation
Create your project directory typeproject/ and run npm init, as shown in the command below:
npm init
Step 4) Start the Installation
Now, we will create package .json which will store the dependencies for our project.
Once done install TypeScript as follows:
npm -g install typescript
The above command will take care of installing TypeScript. Adding “-g” to npm install will install TypeScript globally. The advantage of using -g is that you will be able to use TypeScript tsc command from any directory as it is installed globally. In case you don’t want to install TypeScript globally use below command:
npm --save install typescript
To check if nodejs and npm is installed just check the version in your command prompt.
D:\typeproject>node –version
V10.15.1
D:\typeproject>npm –version
6.4.1
So you have nodejs v10 and npm 6 installed.
Step 3) TypeScript Installation
Create your project directory typeproject/ and run npm init, as shown in the command below:
npm init
Step 4) Start the Installation
Now, we will create package .json which will store the dependencies for our project.
Once done install TypeScript as follows:
npm -g install typescript
The above command will take care of installing TypeScript. Adding “-g” to npm install will install TypeScript globally. The advantage of using -g is that you will be able to use TypeScript tsc command from any directory as it is installed globally. In case you don’t want to install TypeScript globally use below command:
npm –save install typescript
Create src/ folder in your project directory and in src/ folder create TypeScript file test.ts and write your code.Create src/ folder in your project directory and in src/ folder create TypeScript file test.ts and write your code.
Example : test.ts
function add(x:number, y:number) {
	return x+y;
}

let sum = add(5,10);
console.log(sum);
Compile TypeScript code to Javascript
To compile above code use following command:
If TypeScript is installed globally use below command:
tsc test.ts
If TypeScript is installed local to your project you need to use the path of TypeScript from node_modules as shown:
node_modules/typescript/bin/tsc test.ts
The above command will create a test.js file and will be have code compiled to javascript.
Example : test.js
function add(x, y) {
    return x + y;
}
var sum = add(5, 10);
console.log(sum);
Execute Javascript using Nodejs
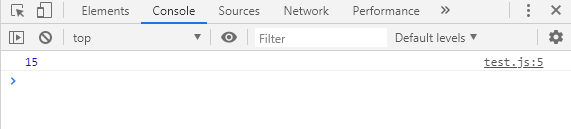
In this TypeScript tutorial, we will execute test.js in nodejs as follows:
D:\typeproject\src>node test.js
15
The value consoled is displayed on the execution of test.js
Execute JavaScript in Browser
Example:
<html>
<head></head>
<body>
http://test.js
</body>
</html>
Compile TypeScript code to Javascript using EcmaScript version
TypeScript supports all the Ecmascript features released, and developers can use the same while coding. But not all the new features support on older browsers, due to which you need to compile javascript to an older version of Ecmascript. TypeScript provides compiler options which can do so.
Example : test.ts
var addnumbers = (a, b) => {
    return a+b;
}

addnumbers(10, 20);
To compile to the ES version of your choice, you can use the target or t option in your command as follows:
tsc --target ES6  test.ts

OR

tsc -t ES6 test.ts
By default, the target is ES3.In case you want to change it, you can use the above command.
At present we will use ES6 in this TypeScript tutorial as the target:
tsc --target ES6 test.ts
test.ts to test.js
var addnumbers = (a, b) => {
    return a+b;
}

addnumbers(10, 20);
The code remains as it is, as the arrow function you have used is a ES6 feature and the same when compiled to ES6 is not changed.
By default the target is ES3 so without target you get test.js as :
var addnumbers = function (a, b) {
    return a + b;
};
addnumbers(10, 20);
So over here, the fat arrow is changed to a normal anonymous function.
Variables in TypeScript
Variables are used to store values, and the value can be a string, number, Boolean, or an expression. When it comes to variables in TypeScript, they are similar to JavaScript. So let’s learn to declare and assign value to variables in TypeScript.
Variables cannot be used in code without defining. To declare a variable you can use
var keyword,
let keyword
const keyword
Working with variables in TypeScript is similar to javascript, and users familiar with javascript will find it very easy. Only variables like let and const are not much used in comparison to var.
Declaring variables using var
Syntax:
var firstname = "Roy";
Let us take a look at few TypeScript examples to understand the working of var keyword and also the scope of variables declared using var keyword.
Example 1:
var  k = 1; // variable k will have a global scope

function test() {
    var c = 1; // variable c is local variable and will be accessible inside function test, it will not be available outside the function.
    return k++;
}

test(); // output as  1
test(); // output as 2
alert(c); // will throw error , Uncaught ReferenceError: c is not defined
Example 2:
var t = 0; // variable t is declared in global scope.
function test() {
    var t = 10; //variable t is again redeclared inside function with value 10, so here t is local to the function and changes done to it will remain inside the function.
    return t;
}
test(); // will return 10.
console.log(t); // will console 0.
Example 3:
var i = 0;
function test() {
    if (i>0) {
      var t = 1;
    }
    return t;
}

test(); // the value returned will be undefined. The if-block has the variable which gets executed when I> 0. Over here the if-block is not expected but you are still having a reference to the variable t, and it returns undefined, this is because var defined variables once defined inside a function will have reference to it inside the function.
i++; // here value of i is incremented.
test(); // since i >0 the if block is executed and value returned is 1.
Declaring variables using let
The TypeScript syntax for let is as given below:
Syntax:
let name="Roy";
The working of let variable is almost same as var, but with a small difference and will understand the same using an TypeScript example.
Example:
let i = 1;
function test() {
    if (i>0) {
	  let t = 1;
    }
    return t;
}

test(); // throws an error : Uncaught ReferenceError: t is not defined.
Above TypeScript example throws an error, but the same would have worked fine if it was with the var keyword. Variables using let are available within the block scope declared, for example, the variable t is available only inside the if-block and not to the entire function.
Also if you happen to declare a variable inside any function, or for-loop, while-loop, TypeScript switch block, it will be available to you only inside that block and no reference to it outside the block, and it will throw an error if the variable is used outside the block. This is the main difference between var and let keyword declared variables.
Declaring variables using const
Const means constant variables. They are similar to let variables, with the only difference, is that once a value is assigned to it cannot be changed.
const name;
Example:
const age = "25";
age="30"; // will throw an error : Uncaught TypeError: Assignment to constant variable.
So users can use const variables only in cases when they know they don’t have to change the values assigned to it.
Types in TypeScript
TypeScript is a strongly typed language, whereas javascript is not. A variable which has a value defined as a string can be changed to a number without any issues in Javascript. The same is not tolerated in TypeScript. In TypeScript, the type to a variable is defined at the start only and through the execution, it has to maintain the same type any changes to it will lead to a compile-time error during compilation to javascript.
Following are the types :
- Number
- String
- Boolean
- Any
- Void
Number
Takes only integers, floats, fractions, etc.
Syntax:
let a :number = 10;
let marks :number = 150;
let price :number = 10.2;
Here are some important methods which can be used on Number types:
toFixed() – it will convert the number to a string and will keep decimal places given to the method.
toString() – this method will convert number to a string.
valueOf() – this method will give back the primitive value of the number.
toPrecision() – this method will format the number to a specified length.
Example : with all String methods
let _num :number = 10.345;
_num.toFixed(2); // "10.35"
_num.valueOf(); // 10.345
_num.toString(); // "10.345"
_num.toPrecision(2); //"10"
String
String: only string values
You can also get the elements from an array using TypeScript for loop as shown below:
Using TypeScript for loop
let years: Array<number> = [ 2016, 2017, 2018, 2019];
for (let i=0;i<=years.length; i++) {
     console.log(years[i]);
}
Output:
2016
2017
2018
2019
Using for-in loop
let years: Array<number> = [ 2016, 2017, 2018, 2019];
for (let i in years) {
     console.log(years[i])
}

Output:
2016
2017
2018
2019
Using for-of loop
let years: Array<number> = [ 2016, 2017, 2018, 2019];
for (let  i of years) {
     console.log(i)
}
Output:
2016
2017
2018
2019
Using foreach loop
let years: Array<number> = [ 2016, 2017, 2018, 2019];
years.forEach(function(yrs, i) {
  console.log(yrs);
});
Output:
2016
2017
2018
2019
["Jan", "Feb", "March", "April", "May", "June", "July", "Aug", "Sept", "Oct", "Nov", "Dec"]; //array with all string values.

console.log(months.pop()); //Dec
Example for shift method
let months: Array<string> = ["Jan", "Feb", "March", "April", "May", "June", "July", "Aug", "Sept", "Oct", "Nov", "Dec"]; //array with all string values.

console.log(months.shift()); // Jan
        return this.age;
    }
}
In the above example, you have a class called Students. It has properties age, name, and roll_no.
Constructor in a TypeScript Class
The class Students example we have defined above, it has a constructor as shown below :
constructor(age: number, name:string, roll_no: number) {
        this.age = age;
        this.name = name;
        this.roll_no = roll_no;
    }
The constructor method has params age, name, and roll_no. The constructor will take care of initializing the properties when the class is called. The properties are accessed using this keyword. Example this.age to access age property, this.roll_no to access roll_no, etc. You can also have a default constructor, as shown below:
constructor () {}
Methods inside a TypeScript Class
The class Students example there are methods defined for example getRollNo(), getName(), getAge() which are used to give details of properties roll_no, name and age.
getRollNo(): number {
        return this.roll_no;
}

getName() : string {
	return this.name;
}

getAge() : number {
	return this.age;
}
Creating Instance of Class in TypeScript
Example:
In TypeScript to create an instance of a class you need to use the new operator. When we create an instance of a class using new operator we get the object which can access the properties and methods of the class as shown below:
let student_details = new Students(15, "Harry John", 33);
student_details.getAge(); // 15
student_details.getName(); // Harry John
        return this.age;
    }
}

class Student extends Person {
    tmarks: number;
    getMarks(): number {
        return this.tmarks;
    }

    setMarks(tmarks) {
        this.tmarks = tmarks;
    }
}

let _std1 = new Student('Sheena', 24);
_std1.getAge(); // output is 24
_std1.setMarks(500);
_std1.getMarks(); // output is 500
You have two classes, Person and Student. Student class extends Person, and the object created on Student is able to access its own methods and properties as well as the class it has extended.
Now let us add some more changes to the above class.
Example:
class Person {
    name: string;
    age: number;

    constructor(name: string, age: number) {
        this.name = name;
        this.age = age;
    }

    getName(): string {
        return this.name;
    }

    getAge(): number {
        return this.age;
    }
}

class Student extends Person {
    tmarks: number;
    constructor(name: string, age: number, tmarks: number) {
        super(name, age);
    }
    getMarks(): number {
        return this.tmarks;
    }

    setMarks(tmarks) {
        this.tmarks = tmarks;
    }
}

let _std1 = new Student('Sheena', 24, 500);
_std1.getAge(); // output is 24
_std1.getMarks(); // output is 500
The changes that you have added in comparison to the previous example is there is a constructor defined in class Student. The constructor has to take the same params as the base class and add any additional params of its own if any.
In TypeScript you need to call super will all the params as the bases params in it. This has to be the first thing to be done inside the constructor. The super will execute the constructor of the extended class.
    height: string;
}

function getDimension() : Dimension {
    let width = "300px";
    let height = "250px";
    return {
        width: width,
        height: height
    }
}
In the above example, the interface Dimension is implemented on the function getDimension() as the return type. The return type of getDimension() has to match with the properties and type mentioned for Interface Dimension.
The compiled code to Javascript will be as follows:
function getDimension() {
    var width = "300px";
    var height = "250px";
    return {
        width: width,
        height: height
    };
}
During compilation, if the return type does not match with the interface, it will throw an error.
function getName(firstname: string, lastname?: string): string {
    return firstname + lastname;
}

let a = getName("John"); // will return Johnundefined.
let b = getName("John", "Harry"); // will return JohnHarry
let c = getName("John", "H", "Harry"); // error TS2554: Expected 1-2 arguments, but got 3.
Please note that the optional params are to be defined in a function at the last only, you cannot have the first param as optional and second param as mandatory.When you call the function with one param compiler will throw an error. So it is necessary to keep the optional params at the end.
Syntax:
enum NameofEnum {
   value1,
   value2,
    ..
}
Example: Enum
enum Directions {
North,
South,
East,
West
}
In the above example, you have defined an enum called Directions. The value given is North, South, East, West. The values are numbered from 0 for the first value in the enum and subsequently increments by 1 for the next valu
    Directions["West"] = "W";
})(Directions || (Directions = {}));
console.log(Directions.North);
console.log(Directions["North"]);
console.log(Directions[0]);
What are the Modules in TypeScript?
The files created in TypeScript have global access, which means that variables declared in one file are easily accessed in another file. This global nature can cause code conflicts and can cause issues with execution at run-time. You have export and import module functionality which can be used to avoid global variable, function conflicts. This feature is available in JavaScript with ES6 release and also supported in TypeScript.
Why do you need Modules in TypeScript?
Following example shows the issue without modules:
Example test1.ts
let age : number = 25;
You have defined a variable age of type number in test1.ts.
Example test2.ts
In test2.ts file you are easily able to access the variable age defined in test1.ts and also modify it as shown below:
age = 30; // changed from 25 to 30.
let _new_age = age;
So the above case can create a lot of problems as the variables are globally available and can be modified.
With Modules, the code written remains locale to the file and cannot be accessed outside it. To access anything from the file, it has to be exported using the export keyword. It is used when you want the variable, class, function, or interface to be used in another file. Import is used when you want to access the exported variable, class, or interface or function too. Doing so the code is written remains intact within the file, and even if you define same variable names, they are not mixed up and behave local to the file where they are declared.
Using Export and Import
There are many ways to export and import. So will discuss syntax here which is mostly used.
The syntax for import and export 1:
export  nameofthevariable or class name or interface name etc

//To import above variable or class name or interface you have to use import as shown below:
alert(a.getName());
Module Loader
Modules cannot work on its own, so you need module loader to locate the import dependencies as you have seen in TypeScript examples shown above. The module loader available is CommonJS for nodejs and Require.js to run in the browser.
To compile code using CommonJS module use following command:
tsc --module commonjs testCustomer.ts
To compile code using Requirejs module use following command:
tsc --module amd testCustomer.ts
The dependent files will get converted to js file with above command.
Example testCustomer.ts to testCustomer.js using Requirejs
define(["require", "exports", "./Customer"], function (require, exports, Customer) {
    "use strict";
    exports.__esModule = true;
    var a = new Customer("Harry", 30);
    alert(a.getName());
});
Example Customer.ts to Customer.js using Requirejs
define(["require", "exports"], function (require, exports) {
    "use strict";
    var Customer = /** @class */ (function () {
        function Customer(name, age) {
            this.name = name;
            this.age = age;
        }
        Customer.prototype.getName = function () {
            return this.name;
        };
        return Customer;
    }());
    return Customer;
});
To test it using require.js, you need to create a file called main.js, which has reference to the dependencies as shown.
Here is the folder structure:
src/
    Customer.js
    testCustomer.js
    main.js
    require.js  // you can get this file from github or npm install requirejs
    test.html
main.js
define(function (require) {
    var customer = require("./Customer");
    var testCustomer = require("./testCustomer");
});
test.html
<!DOCTYPE html>
<html>
<head>
    <title>TypeScript Module testing using Requirejs</title>
    http://require.js
</head>
<body>
    <h3>Testing modules using Requirejs</h3>
</body>
</html>

        return str.toUpperCase();
    },

    convertToLowerCase: function (str) {
        return str.toLowerCase();
    },

    convertToStringBold: function (str) {
        return str.bold();
    }
};
You have an object called StringChecks which has functions like isString, convertToUpperCase, convertToLowerCase, and converToStringBold.
Creating of Ambient Module in TypeScript
Now will create an ambient module which will have reference to above js functions and also add type check as per our requirements.
Filename : tstring.d.ts
declare module TestString {

    export interface StringsFunc {
        isString(str: string): boolean;
        convertToUpperCase(str: string): string;
        convertToLowerCase(str: string): string;
        convertToStringBold(str: string): string;
    }
}

declare var StringChecks: TestString.StringsFunc;
You have to define a module name as TestString and have exported interface StringsFunc.
- in TypeScript to JavaScript using NodeJS.
- So to work with TypeScript you need first to download and install NodeJS.
Summary
- TypeScript is a superset of JavaScript. TypeScript is pure object-oriented programming language that supports classes, interfaces, etc.
- TypeScript supports all the Ecmascript features released, and developers can use the same while coding.
- Variables are used to store values, and the value can be a string, number, Boolean, or an expression.
- In TypeScript, the type to a variable is defined at the start only and through the execution, it has to maintain the same type any changes to it will lead to a compile-time error during compilation to javascript.
- An Array in TypeScript is a data type wherein you can store multiple values.
- Class is a new feature added from ES6 onward, so earlier in JavaScript the class type functionality was tried using a function with prototype functionality to reuse code.
- TypeScript supports public, private, and protected access modifiers to your methods and properties.
- One of the core features of TypeScript is interfaces. The interface is a set of a rule defined which needs to be implemented by the entity using it.
- Functions are set of instructions performed to carry out a task.
- TypeScript Enum is an object which has a collection of related values stored together.
My Latest Posts
• • •
• • •
